HubSpot is a popular CRM that brings together all the required elements to provide an optimal customer experience. It caters to all the marketing and sales requirements of a business to help it scale.
HubSpot allows you to utilize numerous customization abilities to enhance the customer experience. One of them is that you can create, edit, and embed a support form on your website directly from HubSpot in easy and simple steps. This article covers a detailed step-by-step guide to do the aforementioned.
Create a Support Form in HubSpot
This section covers the details of how to create a support form in HubSpot. The steps are as follows:
-
Log in to your HubSpot account. Navigate to Marketing and select Forms from the dropdown of Lead Capture.
.png?width=624&height=282&name=1666709955002%20(1).png)
-
Click on Create a free form button.
.png?width=624&height=219&name=1666709955252%20(1).png)
-
Choose the relevant form type. In this case, we’ll be choosing Embedded form.
.png?width=624&height=291&name=1666709955393%20(1).png)
-
You can either create a form from a blank template to customize it as per requirements or choose a pre-defined form template. We’ll select Support as the form template to start creating the form.
.png?width=624&height=281&name=1666709956052%20(1).png)
-
Write the name of the form in the input field.
-
You can drag and drop the form properties onto the template to set up the form.
.png?width=624&height=276&name=1666709956116%20(1).png)
-
If you want to create a ticket out of your form submissions, enable the toggle button of Ticket Properties.
.png?width=624&height=198&name=1666709955743%20(1).png)
-
If the required property isn’t available in the Existing properties, you can add a new one by going to Create new tab.
-
Select the data type of the form field you intend to create.
.png?width=624&height=251&name=1666709975066%20(1).png)
-
Add the Label of the property.
-
Add the Description of the new field. Note that it's optional to add the description.
.png?width=624&height=352&name=1666709974787%20(1).png)
-
Select the conditions for the new property.
.png?width=624&height=422&name=1666709980844%20(1).png)
-
Drag the Header Text, Paragraph (Rich Text), and Image properties on the form for a better look and feel.
-
You can edit the Header Text by clicking on it after dragging it onto the form.
.png?width=624&height=284&name=1666709968429%20(1).png)
-
Click on the Header Text to edit the formatting in terms of Size, Font, and more.
-
Enter the text of the heading in the text box.
.png?width=624&height=231&name=1666709970509%20(1).png)
-
For the editing of any field, navigate to the Basic tab.
-
Under the Basic tab, you can edit the Label, Help Text, Placeholder text, and more.
.png?width=624&height=229&name=1666709967063%20(1).png)
-
To edit the field from a logical perspective, click on the Logic tab.
.png?width=624&height=200&name=1666709959447%20(1).png)
-
So far, the basic settings of the form are completed. To edit the further options about it, navigate to the Options tab.
-
You can enable the toggle button of the Collect payments if you want to add the payment options for the user after the completion of the form.
-
To display the thank you message after the form completion, edit the details here.
.png?width=624&height=280&name=1666709970560%20(1).png)
-
You can also enable additional submission settings for the form, such as Always create contact for new email address, Set contacts created as marketing contacts, and Add link to reset the form.
.png?width=624&height=208&name=1666709965351%20(1).png)
-
To edit the style of the form, navigate to the Style & preview tab.
-
You can change the input options of the form under this section.
.png?width=624&height=285&name=1666709969923%20(1).png)
-
You can also edit the Link color and text color of the message.
-
To Preview the form or thank you message page, select the respective from the dropdown.
-
Select the preview from Desktop, Tablet, and Mobile.
.png?width=624&height=216&name=1666709961109%20(1).png)
-
Navigate to the Automation tab to enable the automation flows.
-
You can create automation workflows by clicking on the Create this workflow button.

-
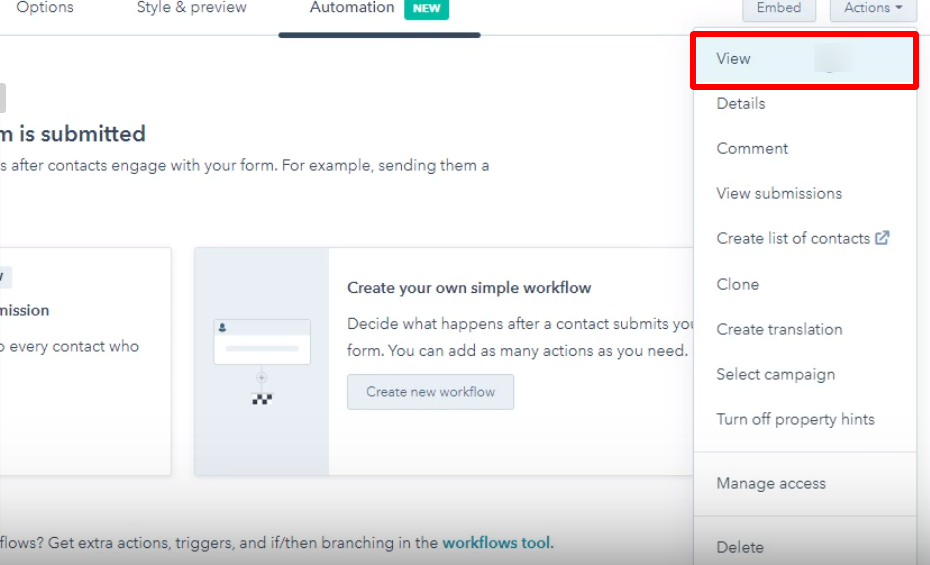
The form setup is complete. To view the created form, select View from the Actions dropdown.
-
Click on the View form button when the prompt appears.

-
The created form will open in the new tab.

-
Review the form details and complete the setup.

-
Navigate to the Embed code tab to access the HTML code to embed the form on your website. Click on the Copy button to copy the embed code.

Edit the HubSpot Support Form
This section covers the details of editing the HubSpot support form. The steps are as follows:
-
Navigate to the Forms. Hover over the form you want to edit.

-
Click on the Edit button.

-
It will open the editing options. Edit the form as per requirements and save the changes.
Embed the HubSpot Support Form
In the previous sections, we covered the detailed step-by-step guide for creating and editing a HubSpot support form. This section covers the steps of embedding a HubSpot support form on the website. The steps are as follows:
-
Navigate to Marketing and select Website Pages from the dropdown of the Website.

-
Click on the Website page from the dropdown of the Create button.

-
Select the Website you want to embed the form on.
-
Enter the Page name and click on Create page.

-
Select the web page template by clicking on Select template for the required one.

-
Navigate to the Content tab to edit the content for the web page.
-
Find the Form field in the Add tab and drag it onto the web page.

-
The form field will be added to the webpage.
-
Enter the Form Title.
-
Select the form you want to add from the Choose a form dropdown.
-
Click on the Create new form button, if you want to create a new one instead of adding the pre-created form.
.png?width=624&height=215&name=1666709985681%20(1).png)
-
The form will be added to the web page.
.png?width=624&height=212&name=1666709980976%20(1).png)
-
Navigate to the Settings tab to change the settings of the added form.
-
Add the Page title to publish the page.
.png?width=624&height=281&name=1666709973396%20(1).png)
-
Click on the Publish page now button to complete the publishing of the page.
.png?width=624&height=278&name=1666709980620%20(1).png)
-
The page has been published. To view it, select View from the dropdown of the More button.
.png?width=624&height=214&name=1666709974862%20(1).png)
-
The added form on the respective page will appear.
.png?width=624&height=316&name=1666709985751%20(1).png)
Sharing a HubSpot Support Form
This section covers the steps of sharing the HubSpot form. The steps are as follows:
-
Navigate to Marketing and select Forms from the dropdown of Lead Capture dropdown.
.png?width=624&height=258&name=1666709973624%20(1).png)
-
Hover over the form you want to share.
-
Click on the Actions button.
.png?width=624&height=161&name=1666709974747%20(1).png)
-
Select Share from the dropdown.
.png?width=624&height=352&name=1666709980922%20(1).png)
-
Since the form setup is complete, navigate to the Share link tab. Click on the Copy button to copy the link and share it as per requirement.

All in all, this was all about creating and embedding the HubSpot support form. The article also covered the details of editing and sharing the HubSpot support form.
For further assistance, contact Learners.ai.