This article provides a step-by-step guide describes the process of setting up lead scoring metrics and the steps of mapping them on the HubSpot.
Generating leads is an essential part of every business’s success. But every sales team knows that finding high quality leads can be a tedious process, if done manually from scratch and affect the productivity of your sales team.
This is where lead scoring models, combined with automation tools and platforms like HubSpot, can be useful to target your ideal customer profiles and improve close rates. Let's take a look at a basic scoring model configured in HubSpot.
In this guide, we will be covering the following topics:
- Customer Lifecycle Stages
- Pillars of Lead Scoring
- Assigning Scores for Lead Scoring
- Implementing Lead Scoring in HubSpot.
- Categorizing scores based on the Lifecycle Stage.
- Viewing Lead Scores with Contacts.
(Feel free to jump directly to the topic of your choice by simply clicking on it.)
1. Customer Lifecycle Stages
We should first assign scores to each of the lifecycle stages of a qualified lead or a potential customer in the sales funnel. In this case, the stages are divided into four categories such as Prospect, Lead, MQL, and SQL with their distinctive scores.
-1.png?width=688&name=1%20meeting%20booked%20with%20SQL%20(1)-1.png)
- Prospect – The scores for this particular category are from 1 to 20. So, any individual having scores in between this range is considered as Prospect.
- Lead – The score range for Lead is 21-60 as shown in the image.
- MQL – This is the lifecycle stage where the individual has submitted the main contact form. The score range for this particular category is 61-80.
- SQL – Once an individual books a call after the submission of the main contact form, it comes under the category of SQL. The score range of SQL is 81-100.
2. Pillars of Lead Scoring
There are three key pillars, or categories of properties, that any lead scoring model should consider. These are: of your lead scoring which in this case are Contact Information, Interactions & Behaviours, and Negatives.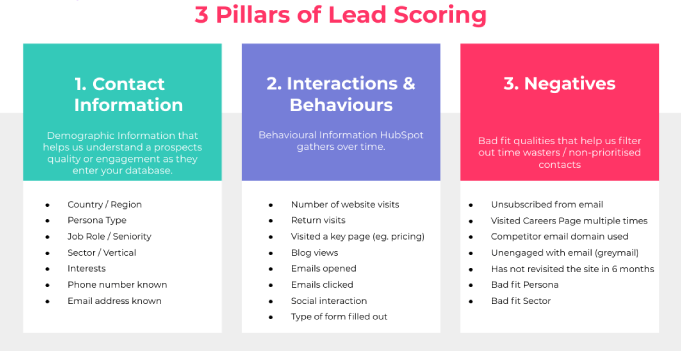
- Contact Information – It deals with all the information relevant to their demographics and can include details like Country/Region, Job Role/Seniority, Phone numbers and Email addresses known, personality profile, credit rating, etc.
- Interactions & Behaviours – It includes all the information gathered by HubSpot over time. This information is inclusive of form submissions, blog views, return visits, social media engagment, and so on.
- Negatives – As the name suggests, it assists you in filtering out the bad fit qualities which can include situations like unsubscribed form email, competitor email domain used, has not revisited the site in 6 months, and more.
3. Assigning Scores for Lead Scoring
Lead scores are assigned based on the business circumstances. These are usually subjective to start, but if there is a large pool of ideal customer profiles available, then predictive lead scoring models can be applied.
In this scenario, the scores are assigned for a business that sells widgets to other businesses: i.e. B2B Inbound Sales. Here is a simple lead scoring set up example.
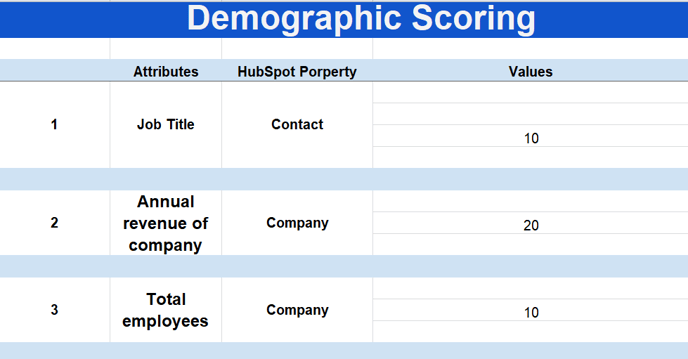
3.1. Demographic Scoring
We have three categories to consider in the demographics, that are Job Title, Annual revenue of the company, and Total Employees with scores of 10, 20, and 10, respectively.
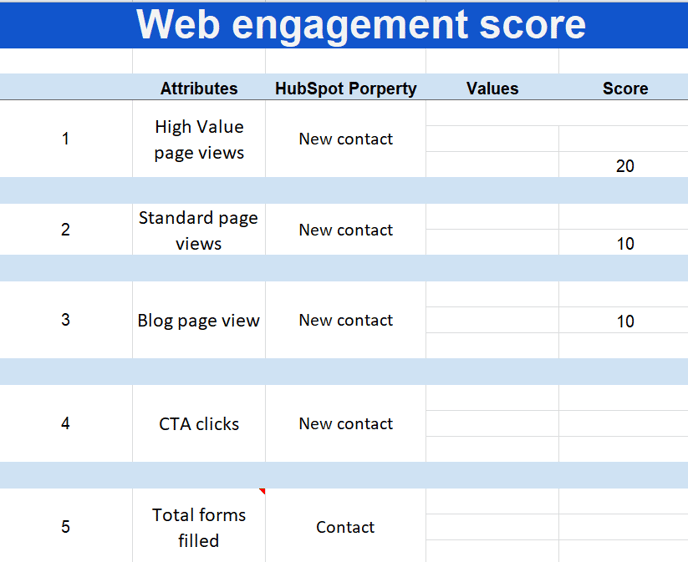
3.2. Web Engagement Scoring
This categories captures the scores for the distinctive web pages. These pages include High-Value Page (ex: Pricing), Standard Page, and Blog Page view with scores of 20, 10, and 10 respectively. It also includes CTA clicks and Total forms filled but the scores are not assigned to them yet.
3.3. Behaviour Scoring
This category assigns 20 points based on whether the Marketing email is clicked. It holds additional attributes as well, but those are not assigned with the scores yet.
All this makes up the scores to be a total of 100. 
4. Implementing Lead Scoring in HubSpot
So far, we have seen how to map customer the journey and assign scores to categories. Now lets look at the steps of implementing lead scoring in HubSpot.
The steps are as follows:
- Navigate to the Properties where you will find two Lead Scoring properties such as Lead Score and Raw Lead Score.
.png?width=688&name=6.1%20properties%20(p).png)
- Click on the Edit in the Raw Lead Score.
.png?width=688&name=6.2%20edit%20(p).png)
3. Here you will be able to see how all the attributes are assigned with the relevant scores. This is the attribute of Job title that says if its known, assign it a score of 10.
.png?width=688&name=7%20job%20title%20is%20known%20(p).png)
Similarly, this is the property of Number of employees that states if the number is greater than equal to 1, assign a score of 10.
-1.png?width=547&name=8%20number%20of%20employees%20(p)-1.png)
4.1. Creating new Positives and Negatives
You can create new positive and negative properties for the attributes to distinguish a high quality lead. As an example, let’s create a new negative property (used to remove or deduct scores on the basis of some criteria). The steps are:
- Click on + Add criteria.
.png?width=688&name=9%20add%20criteria%20(p).png)
2. Select the Filter type from the given options. We have selected Contact properties.
.png?width=688&name=10%20contact%20properties%20(p).png)
3. Choose the fields of the selected property that you want to check which in this case has been selected as Email.
.png?width=688&name=11.1%20email%20(p).png)
4. You can now set up the condition as per your requirement.
.png?width=688&name=11.2%20is%20equal%20to%20any%20of%20(p).png)
5. Assign a score as per your requirement.
.png?width=688&name=12.1%20Set%20score%20(p).png)
6. Go ahead and click on Save and you are done.
.png?width=688&name=12.2%20Save%20(p).png)
5. Categorizing scores based on Customer Lifecycle Stage
We have calculated scores based on the properties decided for different attributes. Now, we will look into the steps of categorizing these scores according to the Customer Lifecycle Stages
1. Navigate to the Workflows where you will be able to find four defined workflows as in Lead score to Lifecycle SQL MQL, Copy contact property Raw Lead Score to contact property Lead Score, Set Lead Score to 80 for form submissions, and Set Lead Score for meeting bookings to 100.
-1.png?width=688&name=13%20workflow%20(p)-1.png)
2. Click on Set Lead Score to 80 for form submissions that defines the workflow for the MQL This workflow simply describes that if someone has filled a form via any page, then set their lead score to 80 which is the score of the category of MQL.
.png?width=688&name=14%20Set%20lead%20Score%20to%2080%20(p).png)
3. Similarly, if you click on the Set Lead Score for meeting bookings to 100, you will see the workflow that states if the user has filled a meeting form or scheduled a call, then assign him the score of 100.
.png?width=688&name=15%20set%20leadscore%20for%20meeting%20(c).png)
4. Lastly, the Copy contact property Raw Lead Score to contact property Lead Score defines the workflow of setting the scores to real value if they are anywhere below 80 and copying the contact property from Raw Lead Score to Lead Score.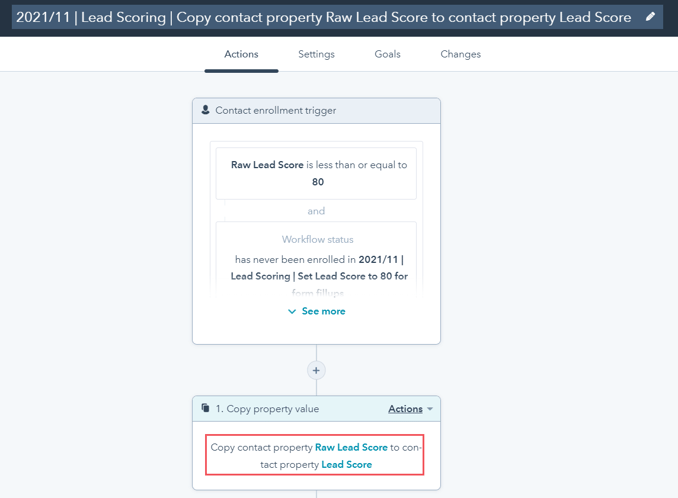
5. You can view these scores assigned to the contacts in the contact list as well. The section below shows how.
6. Viewing Lead Scores with Contacts
To view how these scores are assigned to the contacts, follow these steps:
1. Navigate to the top bar and select Contacts from the dropdown of Contacts..png?width=688&name=17%20contact%20(p).png)
2. Click on the + Add view button and select Lead scoring from the dropdown.
.png?width=688&name=18%20lead%20scoring%20(c).png)
3. You can select the filters that you want to apply to the contacts by clicking on the More filters.
.png?width=688&name=19%20more%20filters%20(c).png)
4. Here you can see the assigned lead scores under the column of LEAD SCORE relevant to each contact. (The maximum displayed score is 60 as none of them have filled the form)
.png?width=688&name=20%20lead%20score%20(c).png)
Lead scoring can be as simple as we detailed in this article.
Now you know you can always add new criteria by defining them in the files of Demographic, Behaviour, or Web Engagement scoring, and setting them up accordingly in HubSpot by following the steps defined in point 4.
If you encounter any difficulties while doing it, or require any further assistance, our team of experts is happy to help.